
Monday, February 26, 2007
HAPPY KATT AGAR AGAR
It took me over 2 hours to make this colourful agar agar. But I am very happy the cat looks very happy. I promised to make this cat agar agar for my very good online friend in Texas. I named it Happy Katt Agar Agar. It is not perfect cause some of the colours are smudged but hope the colourful agar agar would make my friend in Texas a very colourful day and she would be happy everyday.

Photo source: alicecozycorner

Photo source: alicecozycorner
Saturday, February 24, 2007
Koi Fish Agar Agar (Nian Nian You Yu)
It is still Chinese New Year. Wish all Nian Nian You Yu. Below are step by step on how to make Koi Fish Agar Agar. Coloured some coconut agar agar and filled Koi Agar Agar Mould. Filled only the tail, fins and top of body.

 When set, scratch some lines on the agar agar and pour the white coconut agar agar over. Put in fridge to set agar agar. Now it is the time to cook the plain agar agar (without coconut) and coloured it either blue or green.
 Placed the already set koi agar agar on to tray or big bowl.
 Pour clear agar agar into tray to reach half the fish body. Dont covered the whole fish.

 Coloured some coconut agar agar and filled Koi Agar Agar Mould. Filled only the tail, fins and top of body.
 When set, scratch some lines on the agar agar and pour the white coconut agar agar over. Put in fridge to set agar agar. Now it is the time to cook the plain agar agar (without coconut) and coloured it either blue or green.
 Placed the already set koi agar agar on to tray or big bowl.
 Pour clear agar agar into tray to reach half the fish body. Dont covered the whole fish.
I think it looked like real koi fishes swimming in a pond. (But my pond is too small - lol)
Recipe Source: Baking Mom
Photo Source: alicecozycorner
Friday, February 23, 2007
Braised Mushroom (2)
This is my 2nd posting on braised mushroom in addition to the earlier posting. I have adjusted the taste and method of cooking braised mushroom to suit me. My eldest sister say I passed my braised mushrom cooking (lol).

Ingredients
300g mushroom
4 pcs dried oyster (soak about 10 mins and clean)
200 gm pork ribs or spare ribs
2 tbsp cornflour
1 thumbsize ginger (grated over a bowl and keep the grated ginger and juice)
2 tbsp oil
2 tbsp shaoxing wine
1 litre of water (est)
salt to taste
Oyster sauce to taste
Black Moss (soaked in water)
Method
1. Soak mushroom in hot boiling water for half a day.
2. Drain the mushroom and cut off stem and wash them clean.
3. Re-soak mushroom in hot boiling water for at least 4 hours. Then drained.
4. Marinate with grated ginger and ginger juice, cornflour, oil and wine overnight.
5. Boil water with mushroom and dried oyster. When boiled, put to low flame. Keep stirring so that mushroom would not stick to bottom of pot.
6. When boiled after 1 hour, add oyster sauce and salt to taste.
7. Boil for about another hour.
8. During the last 10 minutes, add black moss.
Note: If mushroom is too big, cut into half or bite sizes. If you do not like the taste of shaoxing wine can lesser the amount.
Recipe source: alicecozycorner
Photo source: alicecozycorner
Tuesday, February 13, 2007
MY COZY CORNER
This is my cozycorner where I do all my blogging, playing games, chatting on with friends online, etc. My workstation (lol).
Friday, February 9, 2007

Tuesday, February 6, 2007
Prawns fried with Seah's spices
This is a very easy way of frying your prawns. Bought some spices from Seah's factory in woodlands.


Recipes can be found on the back of the spices back. I think I should whisked the batter for a longer time so that the prawns looks smoother. But it is very crunchy and tasty. Yummy.
Monday, February 5, 2007
Prawns in Soya Sauce
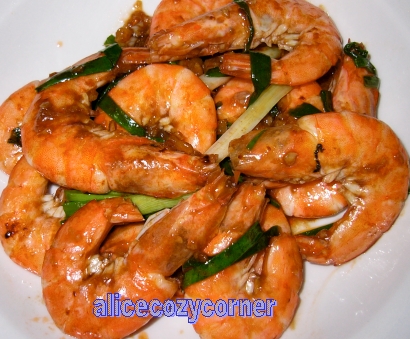
Ingredients
600g big prawns, neatly trimmed
1 tsp chopped young ginger
1 tsp chopped garlic
2 stalks spring onion, cut into 2cm lengths
1 stalk coriander, cut into 2cm lengthsFor sauce:
3 tbsp Shao Hsing Hua Tiao wine
1 1/2 tbsp soya sauce
2 tbsp oyster sauce
1 1/2 tbsp sugar
1 tsp sesame oil
1/2 tbsp thick black soya sauce
Salt and pepper to taste
Thickening (combine):
1 tsp cornflour
2 tbsp water
Method
Pan-fry the prawns in hot oil till they are semi-cooked.
Dish out and put aside.Heat 2 to 3 tbsp oil in wok.
Saute ginger and garlic. Add wine.
When it is fragrant put in sauce ingredients.
Mix in prawns and the rest of the ingredients. Stir-fry well.
Add thickening and stir well. Add a dash of sesame oil to glaze the prawns.
Dish out and serve.
Note: I half the above ingredients.
Recipe Source: Amy Beh
Photo Source: alicecozycorner
Saturday, February 3, 2007
chandelier earrings
Today, we learnt how to make chandelier earrings and it was fun and easy to do but need more practice to perfect my workmanship (lol). Time passes fast, next week will be my final lesson on bead jewellery class. 
Subscribe to:
Posts (Atom)